The most durable of all the greenhouse plastic is called polycarbonate plastic. It is actually a double, or a twin wall, polyethylene plastic. It can last for up to a decade if cared for correctly. It will also maintain a lot of heat and humidity for year-round growing.
- Onions and Shallots. Autumn planting onion sets are easy to grow and will virtually look after themselves over winter. …
- Garlic. Growing garlic couldn’t be easier and there are lots of varieties to choose from for autumn planting. …
- Spring Onions. …
- Perpetual Spinach. …
- Broad Beans. …
- Peas. …
- Asparagus. …
- Winter Salads.
- . Carrots
- Pak Choi
Greenhouse Growing Tips for Beginners
These 6 tips will give any greenhouse novices a head start.
1. Seasonal Starting Seeds
One of the biggest advantages of having a greenhouse is that you can extend growing seasons, getting an early start on spring and summer and even growing certain vegetables all year round. Our growing guide gives you a good insight into what should be planted when, but before you even start planning your growing schedule, it is important that you load up on the vital seed starting supplies you’ll need for a successful yield. At a minimum, you should invest in:
- Containers
- Sterile soil (very important to reduce the chance of pest infestation and diseases)
- Fertilizer
- Water
We also recommend you invest in heat sources to help propagate seeds at the beginning of the season when temperatures are cooler. A propagation heating mat is an inexpensive and easy way to heat seed flats and encourage growth, but there are other methods such as heat cables buried in seed benches.
2. Light Sources
During late Spring and Summer, your greenhouse should be getting enough natural light for the plants, but if you want to grow in late Autumn and Winter, a supplementary lighting system is a must-have if you want healthy, strong plants.
High output fluorescent lamp strips and LED grow lights are amongst the most popular lighting products because, unlike some other lighting systems they output full spectrum light, are very energy efficient and can cover a larger area.
However, if you’re in a small greenhouse, or are growing a smaller crop, a normal fluorescent strip hung 3-7 inches above the plants will often suffice.
3. Heating
Heating a greenhouse in the cooler months can be quite the learning experience in and of itself! For those new, to greenhouse growing, we recommend using electric heaters as they are easier to install, more economical and have a wider range of applications. A small 120-volt heater will usually heat a small greenhouse just fine, although larger greenhouses will need a 240+ volt heater, controlled by a reliable, waterproof thermostat.
Gas heaters work just as well but tend to be less economical and come with the added nuisance of sorting out proper ventilation, with both a constant supply of fresh air for combustion and a means of fume exhaustion.
For the eco-minded out there, less energy-intensive forms of heating include setting up ventilation systems which use unneeded warm air from your home. Some growers with small greenhouses also use items like large rocks and other heat-absorbent materials which absorb heat during sunlight hours and slowly release it throughout the night. Even with supplementary heating sources, these methods are a good way of keeping the temperature inside the greenhouse more consistent throughout the course of a day.
4. Cooling
Even with the UK’s milder climate, during the height of summer, it can be hard to maintain a consistent temperature in a greenhouse. Because they are specifically designed to maintain and trap heat, cooling down a greenhouse that has become too hot is far harder than heating a greenhouse that is too cool.
Therefore consistently and regularly measuring the temperature inside the greenhouse during the hotter months is hugely important. Measuring temperatures regularly can mean the difference between being able to regulate temperature by simply opening the greenhouse door and having to use positive cooling. If your greenhouse does regularly overheat, we recommend using evaporative air coolers, which maintain humidity.
5. Ventilating a Greenhouse
Seasonality plays a huge role in ventilating any size greenhouse. During the summer, convection currents created by the natural heat is more than enough to maintain good circulation. By keeping both the wall vents and the roof vents open during summer, cool air will be pulled in through the walls while hot air will escape through the roof, drawing in a constant supply of fresh air.
During winter, however, maintain air circulation and preventing the growth of mold can be more difficult. Making sure that the soil is not over watered will help a lot, but many greenhouse growers keep an oscillating fan running throughout most of the colder months.
6. Watering the Plants
One of the most common mistakes new growers make is watering plants according to a set schedule. A number of variables dictate when plants need watering, with temperature, humidity and the growth stage of the plants themselves having a huge effect on how much water is needed.
While in the middle of winter you might only need to water a seed bench every 10 days, during summer the frequency will be increased. The best way to know when to water the plants is to measure moisture in the soil, either with specific moisture meters or just by sight and feel of the soil.
Setting up your greenhouse
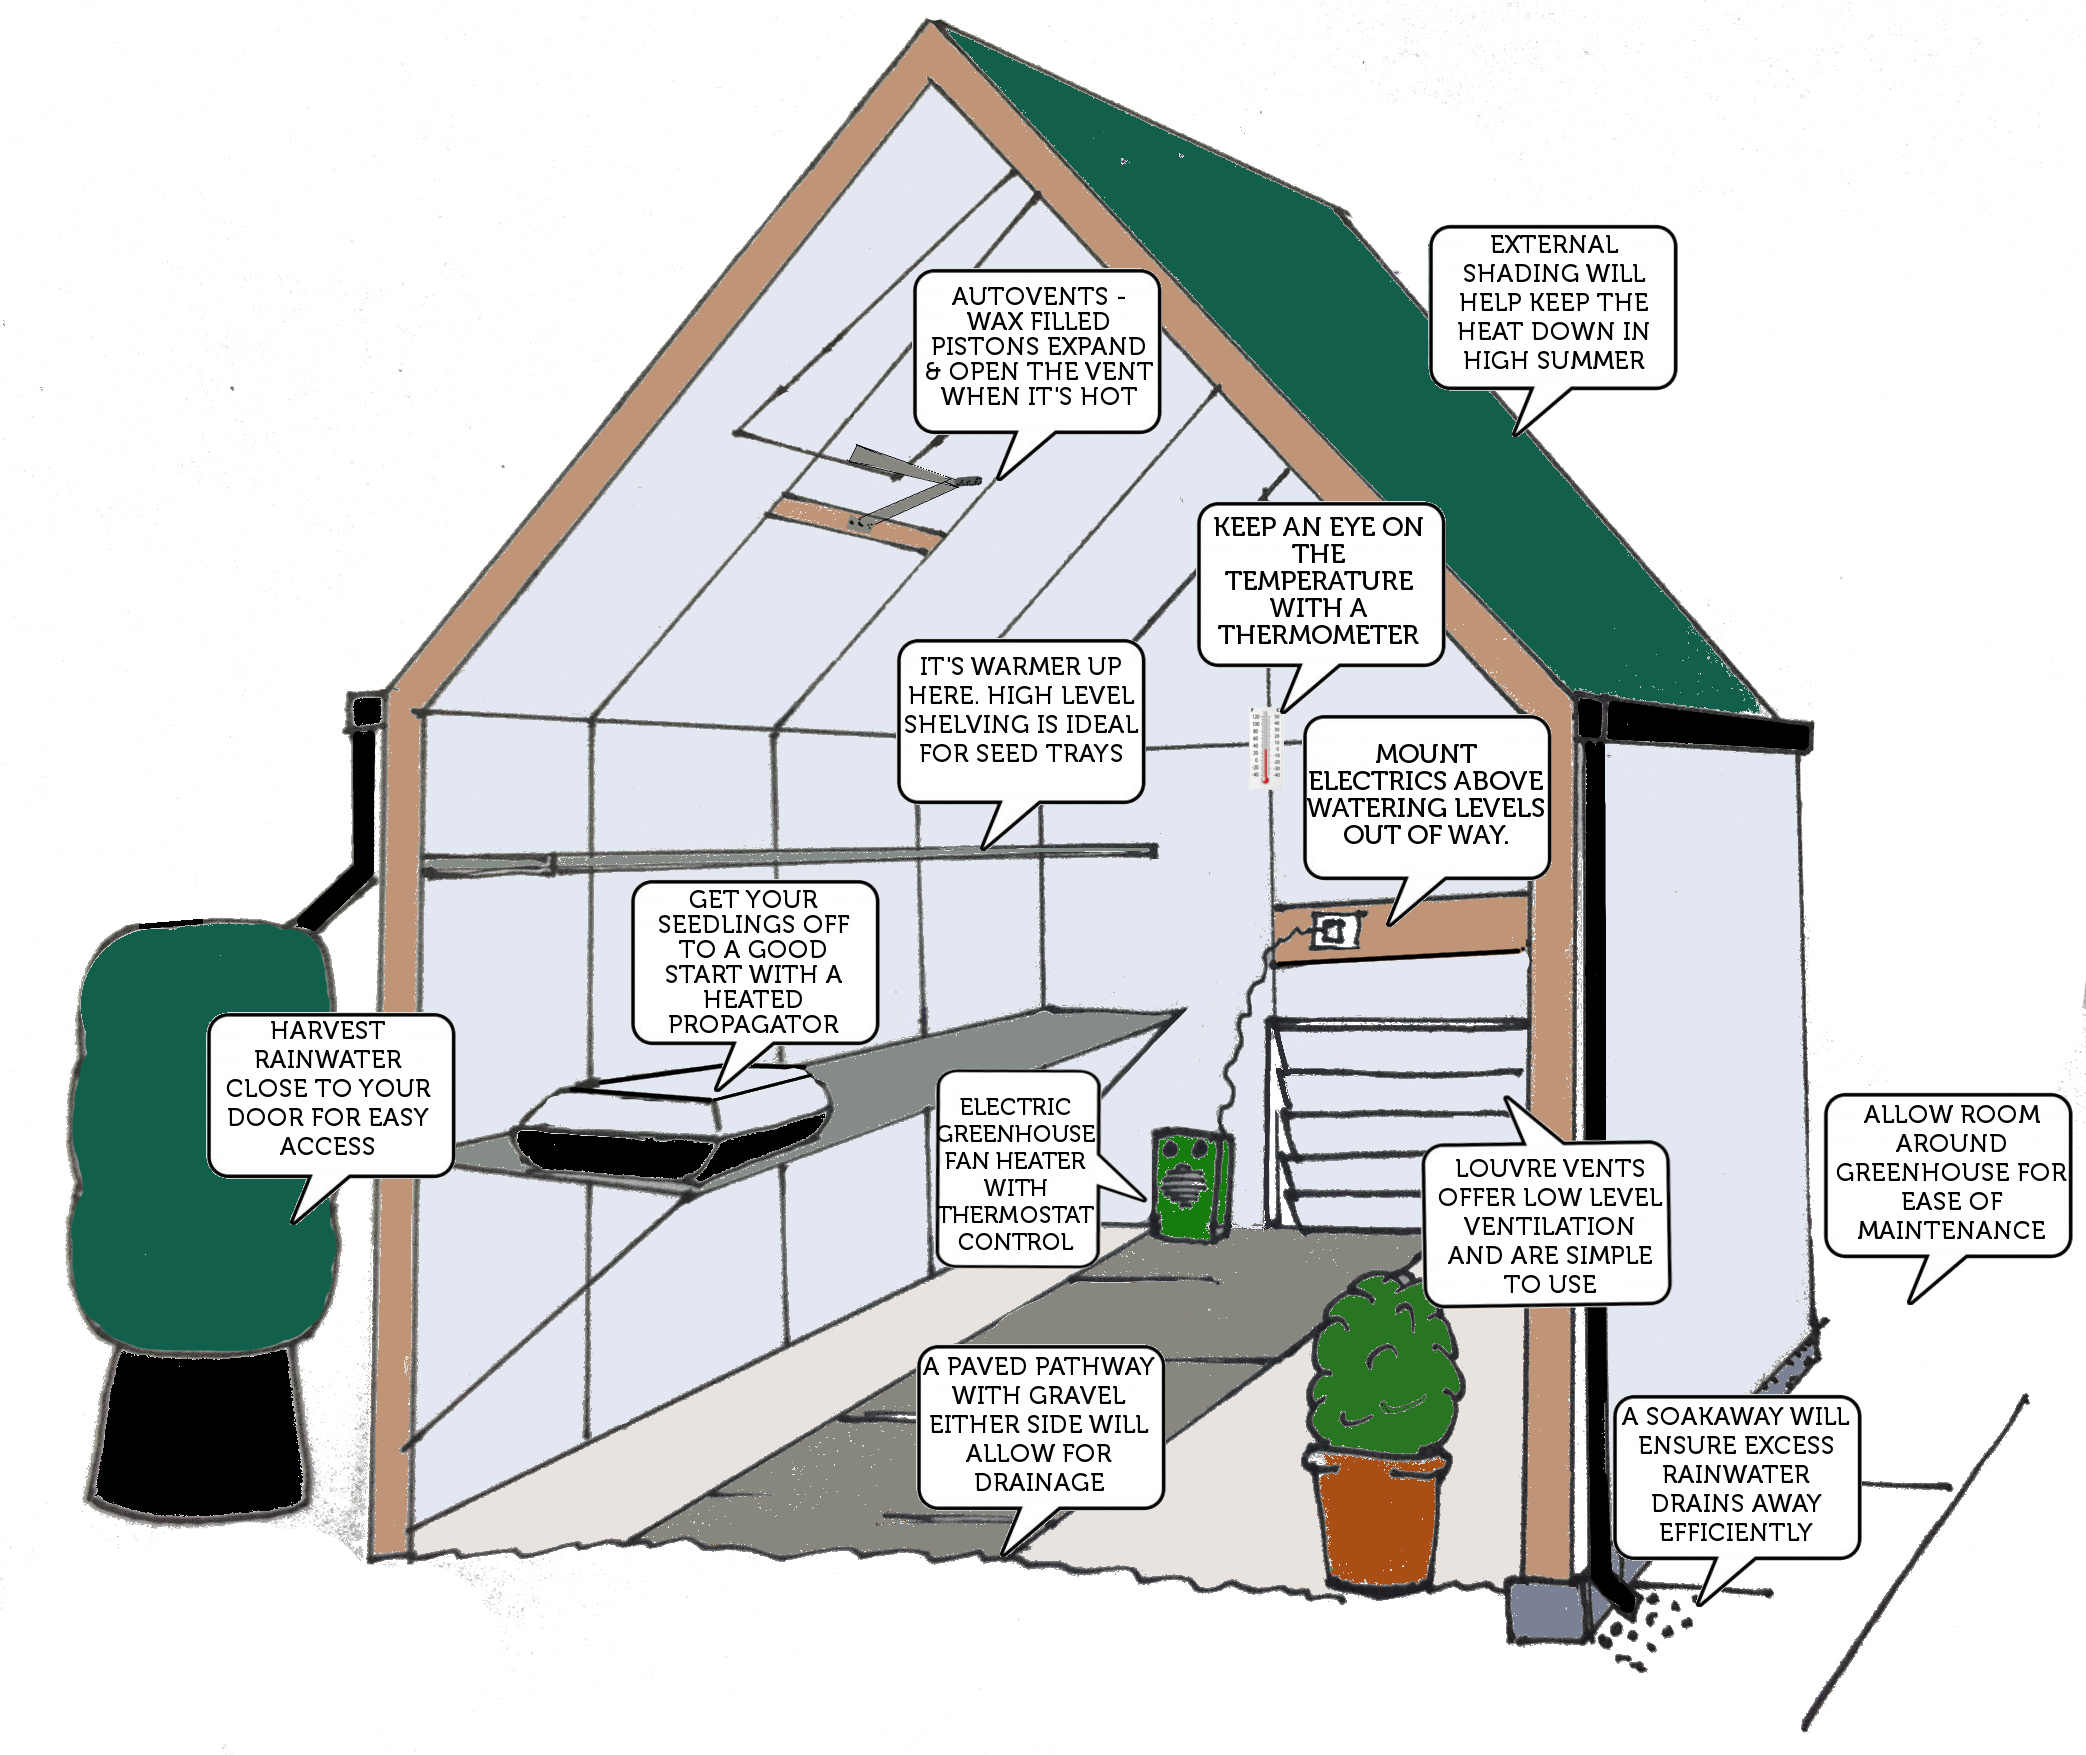
Choosing a suitable greenhouse supplier is only one part of the process. You need to know how to start a greenhouse and there are some important decisions involved in how to set up your greenhouse and the equipment you’ll need. The following greenhouse infographic shows a typical and favorable greenhouse set up.
Before you finalize your greenhouse order, do consider including some of the extras that the makers offer. They will probably add to the cost (unless there’s a special deal, or you are a good negotiator) but it’s advisable to get it properly set up from the beginning, rather than trying to add them later on. Ask yourself how you are going to use your greenhouse.
How to Have the Best Producing Winter Vegetable Garden
There are three important things to consider when planning your winter vegetable garden.
- Where to grow
- When to grow
- What to grow
Where to Grow Winter Vegetables
The first step in starting the best producing winter vegetable garden for your location is finding out where you can grow vegetables during the winter months. Gardeners in northern climates generally have the most success with the use of cold frames or greenhouses to extend the season. Southern climate gardeners have an ideal climate for planting winter crops. Their gardens often offer more variety than their northern counterparts. Extreme southern gardens can grow summer vegetables, such as tomatoes, in the winter months. You can grow winter vegetables almost anywhere, as long as you are willing to put forth the effort required to give your plants the necessary growing conditions. Often this means planting your vegetables on the south side of a building where they will not only receive more sunlight, but also some protection from winter winds. You can also be considering growing vegetables in containers for winter consumption.
Timing Is Critical
Timing is critical when you are planning your winter vegetable garden. It is important to know the first average frost date for your location. Usually, you can find this out by looking at a map of growing zones. Find where you live on the map, and then see what zone it places you in. The chart that goes with the map will usually tell you the first and last frost dates for your zone. You can also call your local Extension Service office and ask them. Once you know when to expect your first hard frost, you can then determine how long it takes for your chosen vegetables to mature. Typically, you will find this information on the back of your seed packet. If you are purchasing seedlings, check for a tag that tells you the days to maturity for that variety of plant.
If the vegetable you have chosen says that it takes 90 days to maturity, simply calculate the date that would be 90 days before the first hard frost in your location. This can be extended a bit if you live in a warmer microclimate or if you use season extenders to protect your vegetable garden.
What Grows in a Winter Garden
There are certain vegetables that are best suited to a winter vegetable garden.

- 90 Days to Maturity
- Beet
- Carrot
- Parsnip
- Rutabaga
- Globe onion
- Brussels sprouts
- Cabbage
- Cauliflower
- 60 Days to Maturity
- Early carrot
- Leek
- Turnip
- Kohlrabi
- Early cabbage
- Collard greens
- Swiss chard
- 30 Days to Maturity
- Chive
- Radish
- Leaf lettuce
- Spinach
Some of these vegetables, like parsnips and Brussels sprouts, actually have a better flavor if allowed to be touched by a light frost. Root vegetables can be harvested very late into the winter if they are protected by heavy mulch.
Winter Gardening Greenhouse Plants
One type of greenhouse is called a cool greenhouse and is the easiest to maintain because you don’t need to provide heat. It is protected from the elements and, with proper positioning, will absorb a great deal of the sun’s warmth on sunny days.
Cool weather plants are a great choice for winter gardening. Greenhouse temperatures that remain consistently below 50 degrees at night will still be warmer than the outside air while offering you a wide range of plants to grow.
There are actually many vegetables and flowers that can grow in these cooler temperatures. Some of the more ideal choices for the best producing winter vegetable garden, as well as flowers, are in the table below.
| Vegetables | Vegetables | Flowers | Flowers |
| Beets | Garlic | Amaryllis | Pansy |
| Broccoli | Kale | Azalea | Primrose |
| Brussels sprouts | Lettuce | Christmas cactus | Snapdragon |
| Cabbage | Parsley | Freesia | |
| Carrots | Radishes | Hyacinth | |
| Cauliflower | Spinach | Impatiens | |
| Celery | Swiss chard | Larkspur | |
| Cilantro | Turnips | Nasturtium |
Benefits of Greenhouse Gardening
For winter gardening, greenhouse gardening offers several benefits. First, it gives a gardener a great deal of satisfaction to enjoy digging in the earth and nurturing plants. This satisfaction is often missed during the typical winter season. Another benefit is, of course, being able to raise plants for winter use. Even if it is just a hobby, it can truly be invigorating to walk into your greenhouse and gaze on brightly blooming flowers. What a contrast to the often dark and dreary days of winter!
Finally, a greenhouse is a great way to get a jump start on spring garden planning. Growing your own bedding plants from seed is not only enjoyable, but it may also offer you more variety than you can find at your local nursery.
Disadvantages
There are a few disadvantages as well. Investing in a greenhouse can be quite a costly undertaking. Greenhouse kits can run for several thousand dollars. If you are handy though, you might look at building one from scratch from one of many available greenhouse plans.
Considerations Before You Build
If you have decided that you truly want a greenhouse, read as much as you can before you purchase your kit. There are also several greenhouse gardening e-books that you can download to your computer for a small fee.
Site
Once you have educated yourself on the specifics, you will need to select a good location for your greenhouse. Choose a site that is level and also has the best exposure to the winter sun. Take into consideration trees and other objects that may provide unwanted shade. If possible, situate your greenhouse so that the long side has a southern exposure.
Space
Be sure your structure will be large enough, not only to grow your plants but also for you to have a workspace. A bench for potting or anything else you need will be greatly appreciated later. You’ll also want adequate storage space for your tools, seeds and other items.
Consider too, you will need to have a layout for your plants. Root crops can easily be grown in bins under the tables that hold your other plants. You can also try growing corn directly into the ground. Inter-plant with squash for a great way to get the most out of your space. Don’t forget to leave room to walk! You can’t enjoy your winter garden if you can’t get near it.
Choosing a Location
Use your “green” common sense when choosing a location for a fall or winter growing spot. A southern-facing side of your house, a shed, wall or barn is a good location for sun exposure and protection from northerly winds. A south-facing slope would be ideal as well.
According to Ed Hume, an expert gardener with one of the longest running gardening television shows in history called Gardening in America, a wall or windbreak can add from 10 to 15 degrees of warmth to your fall or winter garden.
Preparing the Soil
Good soil preparation results in healthier plants. Make sure the soil has good drainage, especially in areas such as the Pacific Northwest, where heavy rain can occur in the fall and winter months. Raised beds help with drainage and can also help raise the temperature of the soil by 8 to 12 degrees according to Ed Hume. Raised beds should be at least 12 inches deep and can be supported by lumber, stone, brick or concrete. Old tires can be used to make single plant raised beds. The black tires absorb heat from the sun, which helps warm the soil inside.
The particle size of the soil also affects the drainage. Sand particles are the largest and allow good drainage, while clay particles are the smallest and often hinder drainage. If your soil has poor drainage or it drains too fast, you can help improve it by adding organic matter such as:
- Compost
- Manure
- Leaf mold
Manure or organic fertilizer will also help add nutrients to the soil that are essential for good plant growth.
When to Plant
A variety of factors must be considered when planting vegetables for a fall or winter harvest. The length of time it takes for each vegetable to mature is one factor. The approximate date of the first killing frost in your area is another factor. Check with your local garden authorities for estimates on dates of the first killing frosts and information on the hardiness of different vegetable crops.
Mid-July (Late Maturing Crops – 90 days)
- Beets
- Brussels sprouts
- Cabbage
- Cauliflower
- Carrots
- Fava beans
- Globe onions
- Parsnip
- Rutabaga
Mid-August (Mid-Season Crops – 60 days)
- Collards
- Early cabbages
- Early carrots
- Kohlrabi
- Leeks
- Perennial flowers
- Perennial herbs
- Swiss chard
- Turnips
- Winter cauliflower
Mid-September (Early Maturing Crops – 30 days)
- Broccoli
- Bunching onions
- Chives
- Cover crops
- Lawn Seed
- Leaf lettuces
- Mustard
- Radishes
- Spinach
